Home Assistant: Intelligent lüften ohne Programmieraufwand!

Erfahren Sie in diesem Video, wie Sie mit Home Assistant in zwei Stufen intelligent lüften können. Die detaillierte Anleitung bietet eine einfache Automatisierung ohne Verwendung von Templates. In der zweiten Stufe wird ein leicht verständliches Template hinzugefügt, um eine präzisere Automatisierung zu ermöglichen

Meine ZigBee Produkte, die ich einsetze *:

Links aus dem Video:

GitHub – dolezsa/thermal_comfort: Thermal Comfort sensor for HA (absolute humidity, heat index, dew point, thermal perception)

Automatisierungsbeispiel „einfache_Lüftungsprüfung“ :

Plain text
Copy to clipboard
Open code in new window
EnlighterJS 3 Syntax Highlighter
alias: einfache_Lüftungsprüfung
description: ""
trigger:
- platform: time_pattern
hours: /1
condition: []
action:
- if:
- condition: numeric_state
entity_id: sensor.sensor_aussen_absolute_luftfeuchtigkeit
below: sensor.sensor_innen_absolute_luftfeuchtigkeit
then:
- service: input_boolean.turn_on
metadata: {}
data: {}
target:
entity_id: input_boolean.luftungshelfer_einfach
else:
- service: input_boolean.turn_off
metadata: {}
data: {}
target:
entity_id: input_boolean.luftungshelfer_einfach
mode: single
alias: einfache_Lüftungsprüfung description: "" trigger: - platform: time_pattern hours: /1 condition: [] action: - if: - condition: numeric_state entity_id: sensor.sensor_aussen_absolute_luftfeuchtigkeit below: sensor.sensor_innen_absolute_luftfeuchtigkeit then: - service: input_boolean.turn_on metadata: {} data: {} target: entity_id: input_boolean.luftungshelfer_einfach else: - service: input_boolean.turn_off metadata: {} data: {} target: entity_id: input_boolean.luftungshelfer_einfach mode: single
alias: einfache_Lüftungsprüfung
description: ""
trigger:
  - platform: time_pattern
    hours: /1
condition: []
action:
  - if:
      - condition: numeric_state
        entity_id: sensor.sensor_aussen_absolute_luftfeuchtigkeit
        below: sensor.sensor_innen_absolute_luftfeuchtigkeit
    then:
      - service: input_boolean.turn_on
        metadata: {}
        data: {}
        target:
          entity_id: input_boolean.luftungshelfer_einfach
    else:
      - service: input_boolean.turn_off
        metadata: {}
        data: {}
        target:
          entity_id: input_boolean.luftungshelfer_einfach
mode: single

Automatisierungsbeispiel „komplexere Lüftungsprüfung mit Template Helfer“ :

Plain text
Copy to clipboard
Open code in new window
EnlighterJS 3 Syntax Highlighter
alias: Lüftungsprüfung
description: ""
trigger:
- platform: time_pattern
hours: /1
condition: []
action:
- if:
- condition: and
conditions:
- condition: numeric_state
entity_id: sensor.sensor_aussen_absolute_luftfeuchtigkeit
below: sensor.sensor_innen_absolute_luftfeuchtigkeit
- condition: numeric_state
entity_id: >-
sensor.prozent_abweichung_innen_zu_aussen_absolute_luftfeuchtigkeit
above: 19
then:
- service: input_boolean.turn_on
metadata: {}
data: {}
target:
entity_id: input_boolean.luftungshelfer
else:
- service: input_boolean.turn_off
metadata: {}
data: {}
target:
entity_id: input_boolean.luftungshelfer
mode: single
alias: Lüftungsprüfung description: "" trigger: - platform: time_pattern hours: /1 condition: [] action: - if: - condition: and conditions: - condition: numeric_state entity_id: sensor.sensor_aussen_absolute_luftfeuchtigkeit below: sensor.sensor_innen_absolute_luftfeuchtigkeit - condition: numeric_state entity_id: >- sensor.prozent_abweichung_innen_zu_aussen_absolute_luftfeuchtigkeit above: 19 then: - service: input_boolean.turn_on metadata: {} data: {} target: entity_id: input_boolean.luftungshelfer else: - service: input_boolean.turn_off metadata: {} data: {} target: entity_id: input_boolean.luftungshelfer mode: single
alias: Lüftungsprüfung
description: ""
trigger:
  - platform: time_pattern
    hours: /1
condition: []
action:
  - if:
      - condition: and
        conditions:
          - condition: numeric_state
            entity_id: sensor.sensor_aussen_absolute_luftfeuchtigkeit
            below: sensor.sensor_innen_absolute_luftfeuchtigkeit
          - condition: numeric_state
            entity_id: >-
              sensor.prozent_abweichung_innen_zu_aussen_absolute_luftfeuchtigkeit
            above: 19
    then:
      - service: input_boolean.turn_on
        metadata: {}
        data: {}
        target:
          entity_id: input_boolean.luftungshelfer
    else:
      - service: input_boolean.turn_off
        metadata: {}
        data: {}
        target:
          entity_id: input_boolean.luftungshelfer
mode: single

Template Helfer Prozent Abweichung absolute Innen zu Aussen-Feuchtigkeit:

Plain text
Copy to clipboard
Open code in new window
EnlighterJS 3 Syntax Highlighter
{{((float(states.sensor.sensor_innen_absolute_luftfeuchtigkeit.state) - float(states.sensor.sensor_aussen_absolute_luftfeuchtigkeit.state)) * 100.00 / float(states.sensor.sensor_innen_absolute_luftfeuchtigkeit.state)) | round(1) | abs() }}

Home Assistant : Frigate NVR installieren für ultimative Sicherheit und tolle Automatisierungen!

Tauche ein in die Welt der Sicherheit! Erfahre in diesem Video, wie du Frigate NVR problemlos unter Home Assistant einrichtest. Von der nahtlosen Integration bis zur stylischen Lovelace Card – alles, was du für ultimativen Schutz brauchst! 🛡️🏡

Hier kannst du den Coral AI beziehen*:

Google Coral USB Edge TPU ML Beschleunigungscoprozessor für Raspberry Pi und andere eingebettete Einzelboard-Computer
  • Spezifikationen: Arm 32-Bit Cortex-M0+ Mikroprozessor (MCU): bis zu 32 MHz max 16 KB Flash-Speicher mit ECC 2 KB RAM-Anschlüsse: USB 3.1 (Gen 1) Port und Kabel (SuperSpeed, 5 Gb/s Übertragungsgeschwindigkeit)

Links aus dem Video:

Frigate: Introduction | Frigate

Coral AI: Get started with the USB Accelerator | Coral

Hinweis:

Bitte beachtet, dass man Frigate NVR nicht auf einem Raspberry Pi mit Micro SD Karte laufen lassen sollte. Durch die häufigen Schreib-/Lesezyklen kann es zu einem schnellen Defekt der Dateisystems kommen. Verwendet hier besser eine SSD !

Für die Verwendung des Coral AI Stick mit einem Raspberry PI, empfehle ich einen separat versorgten USB 3.0 HUB.

Netzwerkspeicher

Für das dauerhafte Recording empfehle ich die Verwendung eines Netzwerkspeichers. Die Einrichtung unter Home Assistant für die Verwendung eines Netzwerkspeichers ist hier beschrieben:

HA Network Storage | Frigate

Wie sich grundsätzlich unter HA ein Netzwerkspeicher z.B. über eine Synology NAS Freigabe einrichten lässt, habe ich in dem Video Backup & Restore erklärt. Hier wäre lediglich als Medium -> Media zu wählen und nicht Backup. Die Media Freigabe muss unter Home Assistant „frigate“ genannt werden.

YouTube player

Konfigurationen:

Hier findest du die frigate.yml :

Plain text
Copy to clipboard
Open code in new window
EnlighterJS 3 Syntax Highlighter
mqtt:
enabled: True
host: 172.16.0.14
user: smarthome
password: smarthome
topic_prefix: frigate
# Optional: client id (default: shown below)
# WARNING: must be unique if you are running multiple instances
client_id: frigate
# Optional: interval in seconds for publishing stats (default: shown below)
stats_interval: 1
# Optional: Detectors configuration. Defaults to a single CPU detector
detectors:
# Required: name of the detector
detector_name:
# Required: type of the detector
# Frigate provided types include 'cpu', 'edgetpu', and 'openvino' (default: shown below)
# Additional detector types can also be plugged in.
# Detectors may require additional configuration.
# Refer to the Detectors configuration page for more information.
type: cpu
birdseye:
enabled: True
restream: True
mode: objects
objects:
track:
- person
- car
filters:
person:
min_area: 5000
max_area: 100000
go2rtc:
streams:
Treppenhaus:
- rtsp://smarthome:Smarthome&More@192.168.101.185:554/h264Preview_01_main
- "ffmpeg:rtsp_cam#audio=opus"
Treppenhaus_sub:
- rtsp://smarthome:Smarthome&More@192.168.101.185:554/h264Preview_01_main
- "ffmpeg:rtsp_cam#audio=opus"
cameras:
Treppenhaus_CAM:
ffmpeg:
inputs:
- path: rtsp://127.0.0.1:8554/Treppenhaus?video=copy&audio=aac
input_args: preset-rtsp-restream
roles:
- record
- path: rtsp://127.0.0.1:8554/Treppenhaus_sub?video=copy
input_args: preset-rtsp-restream
roles:
- detect
detect:
width: 1280
height: 720
fps: 5
snapshots:
enabled: True
record:
enabled: True
retain:
days: 7
events:
retain:
default: 14
mqtt: enabled: True host: 172.16.0.14 user: smarthome password: smarthome topic_prefix: frigate # Optional: client id (default: shown below) # WARNING: must be unique if you are running multiple instances client_id: frigate # Optional: interval in seconds for publishing stats (default: shown below) stats_interval: 1 # Optional: Detectors configuration. Defaults to a single CPU detector detectors: # Required: name of the detector detector_name: # Required: type of the detector # Frigate provided types include 'cpu', 'edgetpu', and 'openvino' (default: shown below) # Additional detector types can also be plugged in. # Detectors may require additional configuration. # Refer to the Detectors configuration page for more information. type: cpu birdseye: enabled: True restream: True mode: objects objects: track: - person - car filters: person: min_area: 5000 max_area: 100000 go2rtc: streams: Treppenhaus: - rtsp://smarthome:Smarthome&More@192.168.101.185:554/h264Preview_01_main - "ffmpeg:rtsp_cam#audio=opus" Treppenhaus_sub: - rtsp://smarthome:Smarthome&More@192.168.101.185:554/h264Preview_01_main - "ffmpeg:rtsp_cam#audio=opus" cameras: Treppenhaus_CAM: ffmpeg: inputs: - path: rtsp://127.0.0.1:8554/Treppenhaus?video=copy&audio=aac input_args: preset-rtsp-restream roles: - record - path: rtsp://127.0.0.1:8554/Treppenhaus_sub?video=copy input_args: preset-rtsp-restream roles: - detect detect: width: 1280 height: 720 fps: 5 snapshots: enabled: True record: enabled: True retain: days: 7 events: retain: default: 14
mqtt:
  enabled: True
  host: 172.16.0.14
  user: smarthome
  password: smarthome
  topic_prefix: frigate
  # Optional: client id (default: shown below)
  # WARNING: must be unique if you are running multiple instances
  client_id: frigate
  # Optional: interval in seconds for publishing stats (default: shown below)
  stats_interval: 1


# Optional: Detectors configuration. Defaults to a single CPU detector
detectors:
  # Required: name of the detector
  detector_name:
    # Required: type of the detector
    # Frigate provided types include 'cpu', 'edgetpu', and 'openvino' (default: shown below)
    # Additional detector types can also be plugged in.
    # Detectors may require additional configuration.
    # Refer to the Detectors configuration page for more information.
    type: cpu 

birdseye:
  enabled: True
  restream: True
  mode: objects

objects:
  track:
    - person
    - car
  filters:
    person:
      min_area: 5000
      max_area: 100000


go2rtc:
  streams:
    Treppenhaus: 
      - rtsp://smarthome:Smarthome&More@192.168.101.185:554/h264Preview_01_main
      - "ffmpeg:rtsp_cam#audio=opus"
    Treppenhaus_sub: 
      - rtsp://smarthome:Smarthome&More@192.168.101.185:554/h264Preview_01_main
      - "ffmpeg:rtsp_cam#audio=opus"

cameras:
  Treppenhaus_CAM:
    ffmpeg:
      inputs:
        - path: rtsp://127.0.0.1:8554/Treppenhaus?video=copy&audio=aac
          input_args: preset-rtsp-restream
          roles:
            - record
        - path: rtsp://127.0.0.1:8554/Treppenhaus_sub?video=copy
          input_args: preset-rtsp-restream
          roles:
            - detect
    detect:
      width: 1280 
      height: 720 
      fps: 5
    snapshots:
      enabled: True
    record:
      enabled: True
      retain: 
        days: 7
      events:
        retain: 
          default: 14

Möchtest du weitere Kameras einbinden, habe ich dir das Beispiel frigate.yml um eine weitere Beispielkamera erweitert ( Beispiel für eine Reolink Kamera z.B. 410, 520, 520a, 511wa). Dieser Vorgang kann für die Anzahl eurer Kameras wiederholt werden. Achtet darauf, dass jede Kamera auch Kapazität von eurem Host-System in Anspruch nimmt.

Weitere Konfigurationsbeispiele für Kameras findest du an dieser Stelle auf der Frigate Dokumentation:

Camera Specific Configurations | Frigate

Beispiel für die Erweiterung um eine weitere Kamera.

Plain text
Copy to clipboard
Open code in new window
EnlighterJS 3 Syntax Highlighter
mqtt:
enabled: True
host: 172.16.0.14
user: smarthome
password: smarthome
topic_prefix: frigate
# Optional: client id (default: shown below)
# WARNING: must be unique if you are running multiple instances
client_id: frigate
# Optional: interval in seconds for publishing stats (default: shown below)
stats_interval: 1
# Optional: Detectors configuration. Defaults to a single CPU detector
detectors:
# Required: name of the detector
detector_name:
# Required: type of the detector
# Frigate provided types include 'cpu', 'edgetpu', and 'openvino' (default: shown below)
# Additional detector types can also be plugged in.
# Detectors may require additional configuration.
# Refer to the Detectors configuration page for more information.
type: cpu
birdseye:
enabled: True
restream: True
mode: objects
objects:
track:
- person
- car
filters:
person:
min_area: 5000
max_area: 100000
go2rtc:
streams:
Treppenhaus:
- rtsp://smarthome:Smarthome&More@192.168.101.185:554/h264Preview_01_main
- "ffmpeg:rtsp_cam#audio=opus"
Treppenhaus_sub:
- rtsp://smarthome:Smarthome&More@192.168.101.185:554/h264Preview_01_main
- "ffmpeg:rtsp_cam#audio=opus"
zweite_Kamera:
- "ffmpeg:http://reolink_ip/flv?port=1935&app=bcs&stream=channel0_main.bcs&user=username&password=password#video=copy#audio=copy#audio=opus"
zweite_Kamera_sub:
- "ffmpeg:http://reolink_ip/flv?port=1935&app=bcs&stream=channel0_ext.bcs&user=username&password=password"
cameras:
Treppenhaus_CAM:
ffmpeg:
inputs:
- path: rtsp://127.0.0.1:8554/Treppenhaus?video=copy&audio=aac
input_args: preset-rtsp-restream
roles:
- record
- path: rtsp://127.0.0.1:8554/Treppenhaus_sub?video=copy
input_args: preset-rtsp-restream
roles:
- detect
detect:
width: 1280
height: 720
fps: 5
snapshots:
enabled: True
record:
enabled: True
retain:
days: 7
events:
retain:
default: 14
zweite_Kamera_CAM:
ffmpeg:
inputs:
- path: rtsp://127.0.0.1:8554/zweite_Kamera?video=copy&audio=aac
input_args: preset-rtsp-restream
roles:
- record
- path: rtsp://127.0.0.1:8554/zweite_Kamera_sub?video=copy
input_args: preset-rtsp-restream
roles:
- detect
detect:
width: 1280
height: 720
fps: 5
snapshots:
enabled: True
record:
enabled: True
retain:
days: 7
events:
retain:
default: 14
mqtt: enabled: True host: 172.16.0.14 user: smarthome password: smarthome topic_prefix: frigate # Optional: client id (default: shown below) # WARNING: must be unique if you are running multiple instances client_id: frigate # Optional: interval in seconds for publishing stats (default: shown below) stats_interval: 1 # Optional: Detectors configuration. Defaults to a single CPU detector detectors: # Required: name of the detector detector_name: # Required: type of the detector # Frigate provided types include 'cpu', 'edgetpu', and 'openvino' (default: shown below) # Additional detector types can also be plugged in. # Detectors may require additional configuration. # Refer to the Detectors configuration page for more information. type: cpu birdseye: enabled: True restream: True mode: objects objects: track: - person - car filters: person: min_area: 5000 max_area: 100000 go2rtc: streams: Treppenhaus: - rtsp://smarthome:Smarthome&More@192.168.101.185:554/h264Preview_01_main - "ffmpeg:rtsp_cam#audio=opus" Treppenhaus_sub: - rtsp://smarthome:Smarthome&More@192.168.101.185:554/h264Preview_01_main - "ffmpeg:rtsp_cam#audio=opus" zweite_Kamera: - "ffmpeg:http://reolink_ip/flv?port=1935&app=bcs&stream=channel0_main.bcs&user=username&password=password#video=copy#audio=copy#audio=opus" zweite_Kamera_sub: - "ffmpeg:http://reolink_ip/flv?port=1935&app=bcs&stream=channel0_ext.bcs&user=username&password=password" cameras: Treppenhaus_CAM: ffmpeg: inputs: - path: rtsp://127.0.0.1:8554/Treppenhaus?video=copy&audio=aac input_args: preset-rtsp-restream roles: - record - path: rtsp://127.0.0.1:8554/Treppenhaus_sub?video=copy input_args: preset-rtsp-restream roles: - detect detect: width: 1280 height: 720 fps: 5 snapshots: enabled: True record: enabled: True retain: days: 7 events: retain: default: 14 zweite_Kamera_CAM: ffmpeg: inputs: - path: rtsp://127.0.0.1:8554/zweite_Kamera?video=copy&audio=aac input_args: preset-rtsp-restream roles: - record - path: rtsp://127.0.0.1:8554/zweite_Kamera_sub?video=copy input_args: preset-rtsp-restream roles: - detect detect: width: 1280 height: 720 fps: 5 snapshots: enabled: True record: enabled: True retain: days: 7 events: retain: default: 14
mqtt:
  enabled: True
  host: 172.16.0.14
  user: smarthome
  password: smarthome
  topic_prefix: frigate
  # Optional: client id (default: shown below)
  # WARNING: must be unique if you are running multiple instances
  client_id: frigate
  # Optional: interval in seconds for publishing stats (default: shown below)
  stats_interval: 1


# Optional: Detectors configuration. Defaults to a single CPU detector
detectors:
  # Required: name of the detector
  detector_name:
    # Required: type of the detector
    # Frigate provided types include 'cpu', 'edgetpu', and 'openvino' (default: shown below)
    # Additional detector types can also be plugged in.
    # Detectors may require additional configuration.
    # Refer to the Detectors configuration page for more information.
    type: cpu 

birdseye:
  enabled: True
  restream: True
  mode: objects

objects:
  track:
    - person
    - car
  filters:
    person:
      min_area: 5000
      max_area: 100000


go2rtc:
  streams:
    Treppenhaus: 
      - rtsp://smarthome:Smarthome&More@192.168.101.185:554/h264Preview_01_main
      - "ffmpeg:rtsp_cam#audio=opus"
    Treppenhaus_sub: 
      - rtsp://smarthome:Smarthome&More@192.168.101.185:554/h264Preview_01_main
      - "ffmpeg:rtsp_cam#audio=opus"
    zweite_Kamera: 
      - "ffmpeg:http://reolink_ip/flv?port=1935&app=bcs&stream=channel0_main.bcs&user=username&password=password#video=copy#audio=copy#audio=opus"
    zweite_Kamera_sub: 
      - "ffmpeg:http://reolink_ip/flv?port=1935&app=bcs&stream=channel0_ext.bcs&user=username&password=password"


cameras:
  Treppenhaus_CAM:
    ffmpeg:
      inputs:
        - path: rtsp://127.0.0.1:8554/Treppenhaus?video=copy&audio=aac
          input_args: preset-rtsp-restream
          roles:
            - record
        - path: rtsp://127.0.0.1:8554/Treppenhaus_sub?video=copy
          input_args: preset-rtsp-restream
          roles:
            - detect
    detect:
      width: 1280 
      height: 720 
      fps: 5
    snapshots:
      enabled: True
    record:
      enabled: True
      retain: 
        days: 7
      events:
        retain: 
          default: 14

  zweite_Kamera_CAM:
    ffmpeg:
      inputs:
        - path: rtsp://127.0.0.1:8554/zweite_Kamera?video=copy&audio=aac
          input_args: preset-rtsp-restream
          roles:
            - record
        - path: rtsp://127.0.0.1:8554/zweite_Kamera_sub?video=copy
          input_args: preset-rtsp-restream
          roles:
            - detect
    detect:
      width: 1280 
      height: 720 
      fps: 5
    snapshots:
      enabled: True
    record:
      enabled: True
      retain: 
        days: 7
      events:
        retain: 
          default: 14
  

Möchtest du den Coral AI verwenden, dann setze an der Stelle Detectors folgende Zeilen ein und ersetzte damit die Zeilen mit dem CPU-Detector:

Plain text
Copy to clipboard
Open code in new window
EnlighterJS 3 Syntax Highlighter
detectors:
coral:
type: edgetpu
device: usb
detectors: coral: type: edgetpu device: usb
detectors:
  coral:
    type: edgetpu
    device: usb

Coral Edge TPU Proxmox :

Um den Coral AI unter Proxmox durchzureichen, führe folgende Zeilen in deiner PVE-Node Shell aus (nicht in der VM !) :

Plain text
Copy to clipboard
Open code in new window
EnlighterJS 3 Syntax Highlighter
echo "deb https://packages.cloud.google.com/apt coral-edgetpu-stable main" | sudo tee /etc/apt/sources.list.d/coral-edgetpu.list
curl https://packages.cloud.google.com/apt/doc/apt-key.gpg | sudo apt-key add -
sudo apt-get update
sudo apt-get install libedgetpu1-std
echo "deb https://packages.cloud.google.com/apt coral-edgetpu-stable main" | sudo tee /etc/apt/sources.list.d/coral-edgetpu.list curl https://packages.cloud.google.com/apt/doc/apt-key.gpg | sudo apt-key add - sudo apt-get update sudo apt-get install libedgetpu1-std
echo "deb https://packages.cloud.google.com/apt coral-edgetpu-stable main" | sudo tee /etc/apt/sources.list.d/coral-edgetpu.list

curl https://packages.cloud.google.com/apt/doc/apt-key.gpg | sudo apt-key add -

sudo apt-get update
sudo apt-get install libedgetpu1-std

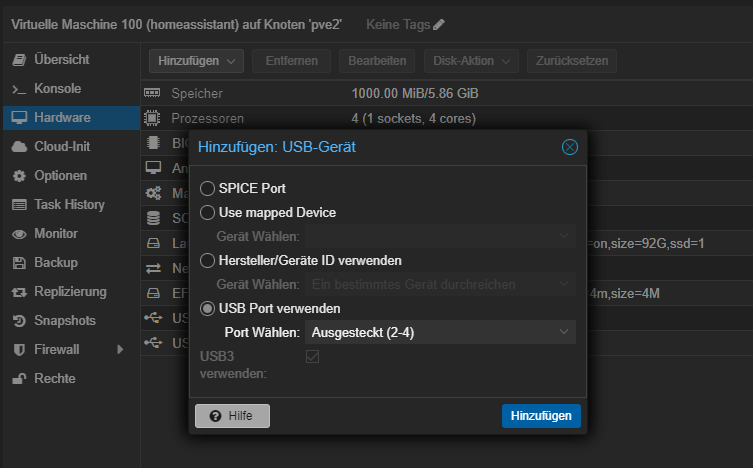
Nun kannst du in deiner VM den USB Edge TPU Adapter wie folgt durchreichen:

Achte dabei darauf ,dass du den Port wählst, wo der Coral AI Stick eingesteckt ist. Bei mir wurde „Ausgesteckt“ angezeigt. Lass dich davon nicht irritieren, wenn das bei dir ebenfalls so sein sollte.

Für die Verwendung der TPU musst du zwingend einen USB 3.x Port verwenden.

Zuletzt muss die Home Assistant VM neu gestartet werden und die Änderung in der friagte.yml durchgeführt werden ( siehe oben ).

In eigener Sache:

Frigate bietet noch viele weitere Möglichkeiten. Diese lassen sich nicht alle in nur einem Video darlegen. Falls dich Frigate mit Home Assistant interessiert, kannst du mir gerne in den Kommentaren des Videos auf Youtube eine Nachricht hinterlassen. Wenn genügend Interesse besteht, werde ich gerne noch weitere Features von Frigate vorstellen ( Masken, Zonen, Beispielautomatisierungen etc. ) .

Home Assistant Templates: Startklar ins Smart Home mit einem einfachen Einstieg!

In diesem Video erlebt ihr den einfachen Einstieg in die Nutzung von Home Assistant Templates. Wir gehen Schritt für Schritt durch die Grundlagen von Templates bis zu einer unkomplizierten Beispielautomatisierung. Dies schafft eine solide Basis für zahlreiche weitere Automatisierungen mit Templates. Entdeckt jetzt die Welt der Smart Home Automatisierung!

Link zur Dokumentation von Home Assistant Templates: https://www.home-assistant.io/docs/configuration/templating/

Template Beispiel Temperatursensoren:

Plain text
Copy to clipboard
Open code in new window
EnlighterJS 3 Syntax Highlighter
{{ (float(states.sensor.temperatur_mia_temperature.state) + float(states.sensor.temperatur_mia_temperature.state) ) /2 }}
{{ (float(states.sensor.temperatur_mia_temperature.state) + float(states.sensor.temperatur_mia_temperature.state) ) /2  }}

Template Beispiel Liste einer Gruppe mit allen ausgeschalteten Lichtern:

Plain text
Copy to clipboard
Open code in new window
EnlighterJS 3 Syntax Highlighter
{{ expand('light.gruppe_lichter_template') | selectattr("state","eq","off") | map(attribute="entity_id") | list }}

Template Beispiel Liste von allen Lichtern die eingeschaltet sind:

Plain text
Copy to clipboard
Open code in new window
EnlighterJS 3 Syntax Highlighter
{{ states.light | selectattr("state","eq","on") | map(attribute="entity_id") | list }}

Template Beispiel Anzahl aller Lichter die eingeschaltet sind:

Plain text
Copy to clipboard
Open code in new window
EnlighterJS 3 Syntax Highlighter
{{ states.light | selectattr("state","eq","on") | map(attribute="entity_id") | list | count }}

Komplette Automatisierung aus dem Video:

Plain text
Copy to clipboard
Open code in new window
EnlighterJS 3 Syntax Highlighter
alias: Video_Template_Beispiel
description: ""
trigger:
- platform: numeric_state
entity_id:
- sensor.entfernung_tobias_von_daheim
below: 0.2
condition: []
action:
- service: light.turn_on
data:
entity_id: >-
{{ expand('light.gruppe_lichter_template') |
selectattr("state","eq","off") | map(attribute="entity_id") | list }}
mode: single
alias: Video_Template_Beispiel description: "" trigger: - platform: numeric_state entity_id: - sensor.entfernung_tobias_von_daheim below: 0.2 condition: [] action: - service: light.turn_on data: entity_id: >- {{ expand('light.gruppe_lichter_template') | selectattr("state","eq","off") | map(attribute="entity_id") | list }} mode: single
alias: Video_Template_Beispiel
description: ""
trigger:
  - platform: numeric_state
    entity_id:
      - sensor.entfernung_tobias_von_daheim
    below: 0.2
condition: []
action:
  - service: light.turn_on
    data:
      entity_id: >-
        {{ expand('light.gruppe_lichter_template') |
        selectattr("state","eq","off") | map(attribute="entity_id") | list }}
mode: single

Template Beispiel Distanz Device Tracker zum Haus:

Plain text
Copy to clipboard
Open code in new window
EnlighterJS 3 Syntax Highlighter
{{ distance('device_tracker.iphone_von_tobias_4') | round(2)}}

Effektives Dimmen: 3 praktische Home Assistant Automatisierungen für deine Beleuchtung!

Entdecke die Magie der Lichtautomatisierung! In diesem Video zeige ich dir 3 faszinierende Wege, wie du das Dimmen von Lichtern mit nur einer Fernbedienung in deinem Smart Home automatisieren kannst. Tauche ein in die Welt der Beleuchtungshacks und erfahre, wie du mit Leichtigkeit die perfekte Atmosphäre in jedem Raum schaffst. Verpasse nicht die Gelegenheit, deinem Zuhause einen Hauch von Smartness zu verleihen – schau jetzt rein und erlebe, wie einfach es sein kann, Licht auf ein neues Level zu heben!

Meine ZigBee Produkte, die ich einsetze *:

Die Fernbedienung findet ihr hier:

STYRBAR Fernbedienung, smart Edelstahl – IKEA Deutschland

Links aus dem Video:

ZigBee2MQTT Devices: Home | Zigbee2MQTT

Automatisierung Dimmer_01:

Plain text
Copy to clipboard
Open code in new window
EnlighterJS 3 Syntax Highlighter
alias: Dimmer_01_Video
description: ""
trigger:
- platform: state
entity_id:
- sensor.remote_studio_action
to: "on"
id: "on"
- platform: state
entity_id:
- sensor.remote_studio_action
to: "off"
id: "off"
condition: []
action:
- if:
- condition: trigger
id:
- "on"
then:
- device_id: fbb93a7f058686a3b2f0591978fb3497
domain: light
entity_id: c4823f315d11423717ef48fe24a15196
type: brightness_increase
- if:
- condition: trigger
id:
- "off"
then:
- device_id: fbb93a7f058686a3b2f0591978fb3497
domain: light
entity_id: c4823f315d11423717ef48fe24a15196
type: brightness_decrease
mode: single
alias: Dimmer_01_Video description: "" trigger: - platform: state entity_id: - sensor.remote_studio_action to: "on" id: "on" - platform: state entity_id: - sensor.remote_studio_action to: "off" id: "off" condition: [] action: - if: - condition: trigger id: - "on" then: - device_id: fbb93a7f058686a3b2f0591978fb3497 domain: light entity_id: c4823f315d11423717ef48fe24a15196 type: brightness_increase - if: - condition: trigger id: - "off" then: - device_id: fbb93a7f058686a3b2f0591978fb3497 domain: light entity_id: c4823f315d11423717ef48fe24a15196 type: brightness_decrease mode: single
alias: Dimmer_01_Video
description: ""
trigger:
  - platform: state
    entity_id:
      - sensor.remote_studio_action
    to: "on"
    id: "on"
  - platform: state
    entity_id:
      - sensor.remote_studio_action
    to: "off"
    id: "off"
condition: []
action:
  - if:
      - condition: trigger
        id:
          - "on"
    then:
      - device_id: fbb93a7f058686a3b2f0591978fb3497
        domain: light
        entity_id: c4823f315d11423717ef48fe24a15196
        type: brightness_increase
  - if:
      - condition: trigger
        id:
          - "off"
    then:
      - device_id: fbb93a7f058686a3b2f0591978fb3497
        domain: light
        entity_id: c4823f315d11423717ef48fe24a15196
        type: brightness_decrease
mode: single

Automatisierung Dimmer_02:

Plain text
Copy to clipboard
Open code in new window
EnlighterJS 3 Syntax Highlighter
alias: Dimmer_02_Video
description: ""
trigger:
- platform: state
entity_id:
- sensor.remote_studio_action
to: brightness_move_up
id: brightness_move_up
- platform: state
entity_id:
- sensor.remote_studio_action
to: brightness_move_down
id: brightness_move_down
- platform: state
entity_id:
- sensor.remote_studio_action
to: brightness_stop
id: brightness_stop
condition: []
action:
- repeat:
sequence:
- if:
- condition: trigger
id:
- brightness_move_up
then:
- device_id: fbb93a7f058686a3b2f0591978fb3497
domain: light
entity_id: c4823f315d11423717ef48fe24a15196
type: brightness_increase
- delay:
hours: 0
minutes: 0
seconds: 0
milliseconds: 400
- if:
- condition: trigger
id:
- brightness_move_down
then:
- device_id: fbb93a7f058686a3b2f0591978fb3497
domain: light
entity_id: c4823f315d11423717ef48fe24a15196
type: brightness_decrease
- delay:
hours: 0
minutes: 0
seconds: 0
milliseconds: 400
while: []
mode: restart
alias: Dimmer_02_Video description: "" trigger: - platform: state entity_id: - sensor.remote_studio_action to: brightness_move_up id: brightness_move_up - platform: state entity_id: - sensor.remote_studio_action to: brightness_move_down id: brightness_move_down - platform: state entity_id: - sensor.remote_studio_action to: brightness_stop id: brightness_stop condition: [] action: - repeat: sequence: - if: - condition: trigger id: - brightness_move_up then: - device_id: fbb93a7f058686a3b2f0591978fb3497 domain: light entity_id: c4823f315d11423717ef48fe24a15196 type: brightness_increase - delay: hours: 0 minutes: 0 seconds: 0 milliseconds: 400 - if: - condition: trigger id: - brightness_move_down then: - device_id: fbb93a7f058686a3b2f0591978fb3497 domain: light entity_id: c4823f315d11423717ef48fe24a15196 type: brightness_decrease - delay: hours: 0 minutes: 0 seconds: 0 milliseconds: 400 while: [] mode: restart
alias: Dimmer_02_Video
description: ""
trigger:
  - platform: state
    entity_id:
      - sensor.remote_studio_action
    to: brightness_move_up
    id: brightness_move_up
  - platform: state
    entity_id:
      - sensor.remote_studio_action
    to: brightness_move_down
    id: brightness_move_down
  - platform: state
    entity_id:
      - sensor.remote_studio_action
    to: brightness_stop
    id: brightness_stop
condition: []
action:
  - repeat:
      sequence:
        - if:
            - condition: trigger
              id:
                - brightness_move_up
          then:
            - device_id: fbb93a7f058686a3b2f0591978fb3497
              domain: light
              entity_id: c4823f315d11423717ef48fe24a15196
              type: brightness_increase
            - delay:
                hours: 0
                minutes: 0
                seconds: 0
                milliseconds: 400
        - if:
            - condition: trigger
              id:
                - brightness_move_down
          then:
            - device_id: fbb93a7f058686a3b2f0591978fb3497
              domain: light
              entity_id: c4823f315d11423717ef48fe24a15196
              type: brightness_decrease
            - delay:
                hours: 0
                minutes: 0
                seconds: 0
                milliseconds: 400
      while: []
mode: restart

Automatisierung Dimmer_03 :

Plain text
Copy to clipboard
Open code in new window
EnlighterJS 3 Syntax Highlighter
alias: Dimmer_03_Video
description: ""
trigger:
- platform: state
entity_id:
- sensor.remote_studio_action
to: brightness_move_up
id: brightness_move_up
- platform: state
entity_id:
- sensor.remote_studio_action
to: brightness_move_down
id: brightness_move_down
- platform: state
entity_id:
- sensor.remote_studio_action
to: brightness_stop
id: brightness_stop
condition: []
action:
- repeat:
sequence:
- if:
- condition: trigger
id:
- brightness_move_up
then:
- service: light.turn_on
metadata: {}
data:
brightness_step_pct: 1
target:
entity_id: light.buro_klavinova_oben
- delay:
hours: 0
minutes: 0
seconds: 0
milliseconds: 400
- if:
- condition: trigger
id:
- brightness_move_down
then:
- service: light.turn_on
metadata: {}
data:
brightness_step_pct: -1
target:
entity_id: light.buro_klavinova_oben
- delay:
hours: 0
minutes: 0
seconds: 0
milliseconds: 400
while: []
mode: restart
alias: Dimmer_03_Video description: "" trigger: - platform: state entity_id: - sensor.remote_studio_action to: brightness_move_up id: brightness_move_up - platform: state entity_id: - sensor.remote_studio_action to: brightness_move_down id: brightness_move_down - platform: state entity_id: - sensor.remote_studio_action to: brightness_stop id: brightness_stop condition: [] action: - repeat: sequence: - if: - condition: trigger id: - brightness_move_up then: - service: light.turn_on metadata: {} data: brightness_step_pct: 1 target: entity_id: light.buro_klavinova_oben - delay: hours: 0 minutes: 0 seconds: 0 milliseconds: 400 - if: - condition: trigger id: - brightness_move_down then: - service: light.turn_on metadata: {} data: brightness_step_pct: -1 target: entity_id: light.buro_klavinova_oben - delay: hours: 0 minutes: 0 seconds: 0 milliseconds: 400 while: [] mode: restart
alias: Dimmer_03_Video
description: ""
trigger:
  - platform: state
    entity_id:
      - sensor.remote_studio_action
    to: brightness_move_up
    id: brightness_move_up
  - platform: state
    entity_id:
      - sensor.remote_studio_action
    to: brightness_move_down
    id: brightness_move_down
  - platform: state
    entity_id:
      - sensor.remote_studio_action
    to: brightness_stop
    id: brightness_stop
condition: []
action:
  - repeat:
      sequence:
        - if:
            - condition: trigger
              id:
                - brightness_move_up
          then:
            - service: light.turn_on
              metadata: {}
              data:
                brightness_step_pct: 1
              target:
                entity_id: light.buro_klavinova_oben
            - delay:
                hours: 0
                minutes: 0
                seconds: 0
                milliseconds: 400
        - if:
            - condition: trigger
              id:
                - brightness_move_down
          then:
            - service: light.turn_on
              metadata: {}
              data:
                brightness_step_pct: -1
              target:
                entity_id: light.buro_klavinova_oben
            - delay:
                hours: 0
                minutes: 0
                seconds: 0
                milliseconds: 400
      while: []
mode: restart

Raspberry Pi 5 & Home Assistant: So gelingt die mühelose Installation (2024)!

Hinweis!:

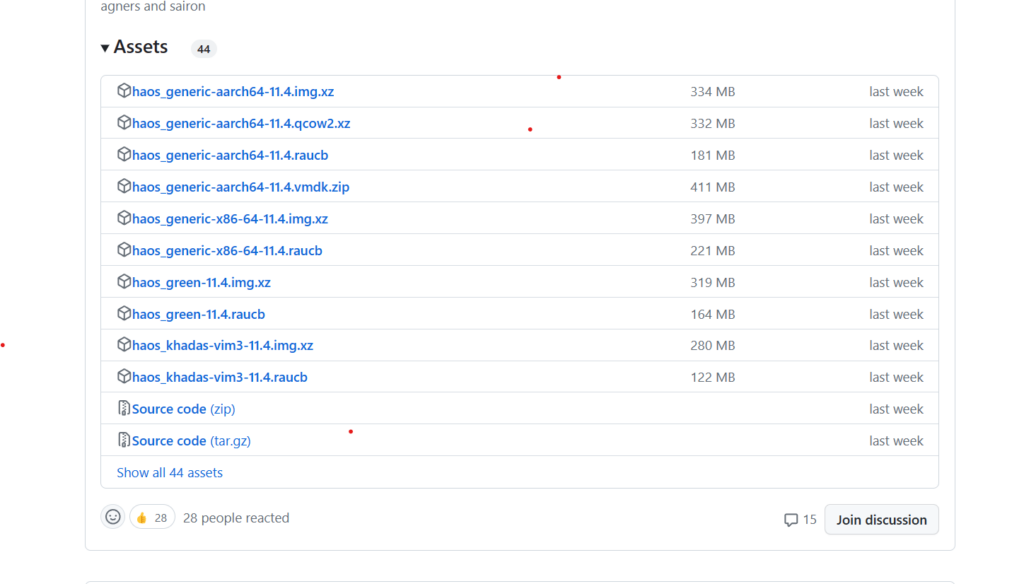
Mittlerweile lässt sich das Image von Home Assistant über den Raspberry Pi Imager installieren, die Links aus dem Video sind nicht mehr gültig: https://www.raspberrypi.com/software/ Dort Raspberry Pi 5 auswählen, Bei Other specific-purpose OS Home Assistant selektieren und Home Assistant auswählen, dann noch die SD Karte selektieren und das Image wird auf die SD Karte gespielt. !!! VG Tobias

Hier findest du ein kurzes Video, welches den Vorgang erklärt:

YouTube player

Die volle Integration: Home Assistant OS mit ZigBee (ZHA) und HACS auf Raspberry Pi 5 installieren. In diesem Video begleite ich euch durch jeden Schritt, um eine vollständige Smart Home Zentrale zu schaffen. Entdeckt die Welt der Home Automation und erfahrt, wie ihr euer Zuhause mit Leichtigkeit auf das nächste Level bringt!

Den Raspberry Pi 5 könnt ihr hier bekommen *:

Diese Zigbee Komponenten habe ich im Einsatz*:

Für die Installation von HACS gib im Terminal folgenden Befehl ein:

Plain text
Copy to clipboard
Open code in new window
EnlighterJS 3 Syntax Highlighter
wget -O - https://get.hacs.xyz | bash -

Effizient und Individuell: Home Assistant Blaupause in nur 20 Minuten erstellen!

Smart ohne Stress: Deine individuelle Home Assistant Blaupause in 20 Minuten – Keine Programmierkenntnisse erforderlich! Bonus: Lade den Blueprint von meiner Blog-Seite herunter, wenn du dir die Arbeit sparen möchtest!

Diese ZigBee Produkte verwende ich* :

Die Anleitung zu den Home Assistant Selectors findest du hier:

Selectors – Home Assistant (home-assistant.io)

Verwendete Automatisierungsvorlage:

Plain text
Copy to clipboard
Open code in new window
EnlighterJS 3 Syntax Highlighter
alias: Bewegung_Blueprint
description: ""
trigger:
- platform: state
entity_id:
- binary_sensor.bewegungsmelder_buro_kuhlschrank_occupancy
to: "on"
id: Bewegung erkannt
- platform: state
entity_id:
- binary_sensor.bewegungsmelder_buro_kuhlschrank_occupancy
to: "off"
for:
hours: 0
minutes: 2
seconds: 0
condition: []
action:
- if:
- condition: trigger
id:
- Bewegung erkannt
- condition: numeric_state
entity_id: sensor.bewegungsmelder_buro_kuhlschrank_illuminance_lux
below: 50
then:
- service: light.turn_on
metadata: {}
data: {}
target:
entity_id:
- light.buro_klavinova_oben
- service: switch.turn_on
target:
entity_id: switch.sonoff_octo_print
data: {}
else:
- service: light.turn_off
metadata: {}
data: {}
target:
entity_id: light.buro_klavinova_oben
- service: switch.turn_off
target:
entity_id: switch.sonoff_octo_print
data: {}
mode: single
alias: Bewegung_Blueprint description: "" trigger: - platform: state entity_id: - binary_sensor.bewegungsmelder_buro_kuhlschrank_occupancy to: "on" id: Bewegung erkannt - platform: state entity_id: - binary_sensor.bewegungsmelder_buro_kuhlschrank_occupancy to: "off" for: hours: 0 minutes: 2 seconds: 0 condition: [] action: - if: - condition: trigger id: - Bewegung erkannt - condition: numeric_state entity_id: sensor.bewegungsmelder_buro_kuhlschrank_illuminance_lux below: 50 then: - service: light.turn_on metadata: {} data: {} target: entity_id: - light.buro_klavinova_oben - service: switch.turn_on target: entity_id: switch.sonoff_octo_print data: {} else: - service: light.turn_off metadata: {} data: {} target: entity_id: light.buro_klavinova_oben - service: switch.turn_off target: entity_id: switch.sonoff_octo_print data: {} mode: single
alias: Bewegung_Blueprint
description: ""
trigger:
  - platform: state
    entity_id:
      - binary_sensor.bewegungsmelder_buro_kuhlschrank_occupancy
    to: "on"
    id: Bewegung erkannt
  - platform: state
    entity_id:
      - binary_sensor.bewegungsmelder_buro_kuhlschrank_occupancy
    to: "off"
    for:
      hours: 0
      minutes: 2
      seconds: 0
condition: []
action:
  - if:
      - condition: trigger
        id:
          - Bewegung erkannt
      - condition: numeric_state
        entity_id: sensor.bewegungsmelder_buro_kuhlschrank_illuminance_lux
        below: 50
    then:
      - service: light.turn_on
        metadata: {}
        data: {}
        target:
          entity_id:
            - light.buro_klavinova_oben
      - service: switch.turn_on
        target:
          entity_id: switch.sonoff_octo_print
        data: {}
    else:
      - service: light.turn_off
        metadata: {}
        data: {}
        target:
          entity_id: light.buro_klavinova_oben
      - service: switch.turn_off
        target:
          entity_id: switch.sonoff_octo_print
        data: {}
mode: single

Beispiel Blueprint :

Wenn du die Blaupause verwenden möchtest, würde ich mich sehr darüber freuen, wenn du meinen Kanal abonnierst. Danke 🙂

Plain text
Copy to clipboard
Open code in new window
EnlighterJS 3 Syntax Highlighter
blueprint:
name: Bewegungserkennung
description: Schaltet Lichter ein, wenn Bewegung erkannt wird und eine Helligkeit unterschritten ist
domain: automation
author: smart home & more
input:
lichter_input:
name: Lichter
default: {}
selector:
entity:
domain:
- light
schalter_input:
name: Schalter
default: {}
selector:
entity:
domain:
- switch
bewegungsmelder_input:
name: Bewegungsmelder
selector:
entity:
domain:
- binary_sensor
device_class: motion
lichtsensor_input:
name: Licht Sensor
selector:
entity:
domain:
- sensor
device_class: illuminance
lichtsensor_value_input:
name: Licht Intensität
description: Licht wird eingeschaltet, wenn der Wert unter dem Eingabewert liegt
default: 400
triggerzeit_input:
name: Einschalt-Zeit
description: Zeitspanne , wie lange das Licht eingeschaltet sein soll
selector:
number:
min: 0
max: 60
unit_of_measurement: minutes
mode: single
trigger:
- platform: state
entity_id: !input bewegungsmelder_input
to: "on"
id: Bewegung erkannt
- platform: state
entity_id: !input bewegungsmelder_input
to: "off"
for:
hours: 0
minutes: !input triggerzeit_input
seconds: 0
condition: []
action:
- if:
- condition: trigger
id:
- Bewegung erkannt
- condition: numeric_state
entity_id: !input lichtsensor_input
below: !input lichtsensor_value_input
then:
- service: light.turn_on
target:
entity_id: !input lichter_input
- service: switch.turn_on
target:
entity_id: !input schalter_input
else:
- service: light.turn_off
target:
entity_id: !input lichter_input
- service: switch.turn_off
target:
entity_id: !input schalter_input
blueprint: name: Bewegungserkennung description: Schaltet Lichter ein, wenn Bewegung erkannt wird und eine Helligkeit unterschritten ist domain: automation author: smart home & more input: lichter_input: name: Lichter default: {} selector: entity: domain: - light schalter_input: name: Schalter default: {} selector: entity: domain: - switch bewegungsmelder_input: name: Bewegungsmelder selector: entity: domain: - binary_sensor device_class: motion lichtsensor_input: name: Licht Sensor selector: entity: domain: - sensor device_class: illuminance lichtsensor_value_input: name: Licht Intensität description: Licht wird eingeschaltet, wenn der Wert unter dem Eingabewert liegt default: 400 triggerzeit_input: name: Einschalt-Zeit description: Zeitspanne , wie lange das Licht eingeschaltet sein soll selector: number: min: 0 max: 60 unit_of_measurement: minutes mode: single trigger: - platform: state entity_id: !input bewegungsmelder_input to: "on" id: Bewegung erkannt - platform: state entity_id: !input bewegungsmelder_input to: "off" for: hours: 0 minutes: !input triggerzeit_input seconds: 0 condition: [] action: - if: - condition: trigger id: - Bewegung erkannt - condition: numeric_state entity_id: !input lichtsensor_input below: !input lichtsensor_value_input then: - service: light.turn_on target: entity_id: !input lichter_input - service: switch.turn_on target: entity_id: !input schalter_input else: - service: light.turn_off target: entity_id: !input lichter_input - service: switch.turn_off target: entity_id: !input schalter_input
blueprint:
  name: Bewegungserkennung
  description: Schaltet Lichter ein, wenn Bewegung erkannt wird und eine Helligkeit unterschritten ist
  domain: automation
  author: smart home & more
  input:
      lichter_input:
        name: Lichter
        default: {}
        selector:
            entity:
              domain:
                - light    
      schalter_input:
        name: Schalter
        default: {}
        selector:
            entity:
              domain:
                - switch
      bewegungsmelder_input:
        name: Bewegungsmelder
        selector:
            entity:
              domain:
                - binary_sensor
              device_class: motion
      lichtsensor_input:
        name: Licht Sensor
        selector:
          entity: 
            domain:
              - sensor
            device_class: illuminance
      lichtsensor_value_input:
        name: Licht Intensität
        description: Licht wird eingeschaltet, wenn der Wert unter dem Eingabewert liegt
        default: 400
      triggerzeit_input:
        name: Einschalt-Zeit
        description: Zeitspanne , wie lange das Licht eingeschaltet sein soll
        selector:
          number:
            min: 0
            max: 60
            unit_of_measurement: minutes
mode: single
trigger:
  - platform: state
    entity_id: !input bewegungsmelder_input
    to: "on"
    id: Bewegung erkannt
  - platform: state
    entity_id: !input bewegungsmelder_input
    to: "off"
    for:
      hours: 0
      minutes: !input triggerzeit_input
      seconds: 0
condition: []
action:
  - if:
      - condition: trigger
        id:
          - Bewegung erkannt
      - condition: numeric_state
        entity_id: !input lichtsensor_input
        below: !input lichtsensor_value_input
    then:
      - service: light.turn_on
        target:
          entity_id: !input lichter_input
      - service: switch.turn_on
        target:
          entity_id: !input schalter_input
    else:
      - service: light.turn_off
        target:
          entity_id: !input lichter_input
      - service: switch.turn_off
        target:
          entity_id: !input schalter_input


Home Assistant Bedingungen: Umfassende Erklärung für effektive Automationen (2024)!

Meistere die Feinheiten von Home Assistant Bedingungen (Version 2024.x) in diesem detaillierten Video. Wir nehmen uns Zeit, die verschiedenen Zustände (UND, ODER, NICHT) anhand einer praxisnahen Beispielautomatisierung zu erklären. Vertiefe dein Verständnis für diese leistungsstarken Funktionen und optimiere deine Smart-Home-Automatisierungen. Schalte ein für eine umfassende Auseinandersetzung mit den Bedingungen in Home Assistant!

Diese ZigBee Produkte verwende ich * :

Beispielautomatisierung Bedingungen:

Plain text
Copy to clipboard
Open code in new window
EnlighterJS 3 Syntax Highlighter
alias: Bedingungen_Video
description: ""
trigger:
- platform: time_pattern
minutes: /1
condition:
- condition: and
conditions:
- condition: time
after: "10:00:00"
before: "20:00:00"
- condition: not
conditions:
- condition: numeric_state
entity_id: sensor.zeitlueftung
above: 1
- condition: or
conditions:
- condition: state
entity_id: binary_sensor.helfer_luftungsfenster_im_haus
state: "off"
- condition: state
entity_id: input_boolean.helfer_luftungsbenachrichtung
state: "off"
action:
- service: input_boolean.turn_on
metadata: {}
data: {}
target:
entity_id: input_boolean.helfer_luftungsbenachrichtung
- service: notify.notify
metadata: {}
data:
message: Es wurde heute noch nicht genug gelüftet
title: Lüftungsbenachtrichtigung
mode: single
alias: Bedingungen_Video description: "" trigger: - platform: time_pattern minutes: /1 condition: - condition: and conditions: - condition: time after: "10:00:00" before: "20:00:00" - condition: not conditions: - condition: numeric_state entity_id: sensor.zeitlueftung above: 1 - condition: or conditions: - condition: state entity_id: binary_sensor.helfer_luftungsfenster_im_haus state: "off" - condition: state entity_id: input_boolean.helfer_luftungsbenachrichtung state: "off" action: - service: input_boolean.turn_on metadata: {} data: {} target: entity_id: input_boolean.helfer_luftungsbenachrichtung - service: notify.notify metadata: {} data: message: Es wurde heute noch nicht genug gelüftet title: Lüftungsbenachtrichtigung mode: single
alias: Bedingungen_Video
description: ""
trigger:
  - platform: time_pattern
    minutes: /1
condition:
  - condition: and
    conditions:
      - condition: time
        after: "10:00:00"
        before: "20:00:00"
      - condition: not
        conditions:
          - condition: numeric_state
            entity_id: sensor.zeitlueftung
            above: 1
      - condition: or
        conditions:
          - condition: state
            entity_id: binary_sensor.helfer_luftungsfenster_im_haus
            state: "off"
      - condition: state
        entity_id: input_boolean.helfer_luftungsbenachrichtung
        state: "off"
action:
  - service: input_boolean.turn_on
    metadata: {}
    data: {}
    target:
      entity_id: input_boolean.helfer_luftungsbenachrichtung
  - service: notify.notify
    metadata: {}
    data:
      message: Es wurde heute noch nicht genug gelüftet
      title: Lüftungsbenachtrichtigung
mode: single

Beispielautomatisierung Helfer zurücksetzen:

Plain text
Copy to clipboard
Open code in new window
EnlighterJS 3 Syntax Highlighter
alias: Helfer Zurücksetzen
description: ""
trigger:
- platform: time
at: "00:00:00"
condition: []
action:
- service: input_boolean.turn_off
metadata: {}
data: {}
target:
entity_id: input_boolean.helfer_luftungsbenachrichtung
mode: single
alias: Helfer Zurücksetzen description: "" trigger: - platform: time at: "00:00:00" condition: [] action: - service: input_boolean.turn_off metadata: {} data: {} target: entity_id: input_boolean.helfer_luftungsbenachrichtung mode: single
alias: Helfer Zurücksetzen
description: ""
trigger:
  - platform: time
    at: "00:00:00"
condition: []
action:
  - service: input_boolean.turn_off
    metadata: {}
    data: {}
    target:
      entity_id: input_boolean.helfer_luftungsbenachrichtung
mode: single

Configuration.YAML ( History Stat )

Plain text
Copy to clipboard
Open code in new window
EnlighterJS 3 Syntax Highlighter
sensor:
- platform: history_stats
name: zeitlueftung
entity_id: binary_sensor.helfer_luftungsfenster_im_haus
state: "on"
type: time
start: "{{ now().replace(hour=0, minute=0, second=0) }}"
end: "{{ now() }}"
sensor: - platform: history_stats name: zeitlueftung entity_id: binary_sensor.helfer_luftungsfenster_im_haus state: "on" type: time start: "{{ now().replace(hour=0, minute=0, second=0) }}" end: "{{ now() }}"
sensor: 

  - platform: history_stats
    name: zeitlueftung
    entity_id: binary_sensor.helfer_luftungsfenster_im_haus
    state: "on"
    type: time
    start: "{{ now().replace(hour=0, minute=0, second=0) }}"
    end: "{{ now() }}"

Alle Home Assistant Auslöser/Trigger – Komplett erklärt !

In diesem Video erkläre ich euch alle Auslöser / Trigger . Dabei wird für fast jeden Auslöser auch ein Beispiel gezeigt. Es stellt den Anfang einer Automatisierungsreihe dar und soll euch dabei helfen die Möglichkeiten von Home Assistant kennenzulernen.

Die von mir verwendeten ZigBee Produkte findest du hier*:

Alle Auslöser im Überblick:

  • Gerät
  • Numerischer Zustand
  • Kalender
  • Sonnenaufgang/Sonnenuntergang
  • Zeit
  • Zeitraster
  • Zone
  • Dauerhafte Benachrichtigung
  • Ereignis/Event
  • Geolokalisierung
  • Home Assistant
  • Satz
  • Tag
  • Template Trigger
  • Webhook

Detaillierte Erläuterungen findet ihr auf der Home Assistant Webseite:

Automation Trigger – Home Assistant (home-assistant.io)

Zustände sichern & abrufen: So verfeinerst du Home Assistant Automatisierungen!

Optimiere deine Home Assistant Automatisierungen mit präziser Zustandswiederherstellung. In diesem Video erfährst du, wie du den Anfangszustand deiner Geräte, sei es Beleuchtung, Rollos oder andere, gezielt in Automatisierungen integrierst. Erlerne die Kunst der Feinabstimmung für ein perfektes und zuverlässiges Smart-Home-Erlebnis. Entdecke, wie du mit Home Assistant deine individuellen Anforderungen erfüllen kannst und ein maßgeschneidertes, effizientes Automatisierungssystem schaffst.

Diese ZigBee Produkte verwende ich * :

Die Automatisierungsbeispiele als YAML Code könnt ihr hier nochmal nachvollziehen.

Automatisierungsbeispiel 1 ( Rollosteuerung bei Wind):

Plain text
Copy to clipboard
Open code in new window
EnlighterJS 3 Syntax Highlighter
alias: Rollosteuerung_bei_Wind
description: ""
trigger:
- platform: state
entity_id:
- input_boolean.wind
to: "on"
id: es ist windig
- platform: state
entity_id:
- input_boolean.wind
to: "off"
id: es ist nicht mehr windig
condition: []
action:
- if:
- condition: trigger
id:
- es ist windig
then:
- service: scene.create
data:
scene_id: zustandeliasrollos
snapshot_entities:
- cover.elia_rollo_links
- cover.elia_rollo_rechts
- service: cover.open_cover
target:
entity_id:
- cover.elia_rollo_links
- cover.elia_rollo_rechts
data: {}
- if:
- condition: trigger
id:
- es ist nicht mehr windig
then:
- service: scene.turn_on
target:
entity_id: scene.zustandeliasrollos
metadata: {}
mode: single
alias: Rollosteuerung_bei_Wind description: "" trigger: - platform: state entity_id: - input_boolean.wind to: "on" id: es ist windig - platform: state entity_id: - input_boolean.wind to: "off" id: es ist nicht mehr windig condition: [] action: - if: - condition: trigger id: - es ist windig then: - service: scene.create data: scene_id: zustandeliasrollos snapshot_entities: - cover.elia_rollo_links - cover.elia_rollo_rechts - service: cover.open_cover target: entity_id: - cover.elia_rollo_links - cover.elia_rollo_rechts data: {} - if: - condition: trigger id: - es ist nicht mehr windig then: - service: scene.turn_on target: entity_id: scene.zustandeliasrollos metadata: {} mode: single
alias: Rollosteuerung_bei_Wind
description: ""
trigger:
  - platform: state
    entity_id:
      - input_boolean.wind
    to: "on"
    id: es ist windig
  - platform: state
    entity_id:
      - input_boolean.wind
    to: "off"
    id: es ist nicht mehr windig
condition: []
action:
  - if:
      - condition: trigger
        id:
          - es ist windig
    then:
      - service: scene.create
        data:
          scene_id: zustandeliasrollos
          snapshot_entities:
            - cover.elia_rollo_links
            - cover.elia_rollo_rechts
      - service: cover.open_cover
        target:
          entity_id:
            - cover.elia_rollo_links
            - cover.elia_rollo_rechts
        data: {}
  - if:
      - condition: trigger
        id:
          - es ist nicht mehr windig
    then:
      - service: scene.turn_on
        target:
          entity_id: scene.zustandeliasrollos
        metadata: {}
mode: single

Automatisierungsbeispiel 2 ( Scene Save TV Lampe)

Plain text
Copy to clipboard
Open code in new window
EnlighterJS 3 Syntax Highlighter
alias: Scene Save TV Lampe
description: ""
trigger:
- platform: state
entity_id:
- input_boolean.helfer_bewegungsmelder
to: "on"
condition: []
action:
- service: scene.create
data:
scene_id: zustandtvbeleuchtung
snapshot_entities:
- light.tv_bloom_eg_links
- light.tv_bloom_eg_rechts
- service: light.turn_on
target:
entity_id:
- light.tv_bloom_eg_links
- light.tv_bloom_eg_rechts
data:
brightness_pct: 100
rgb_color:
- 255
- 0
- 0
- delay:
hours: 0
minutes: 0
seconds: 15
milliseconds: 0
- service: scene.turn_on
target:
entity_id: scene.zustandtvbeleuchtung
metadata: {}
- service: scene.delete
data: {}
target:
entity_id: scene.zustandtvbeleuchtung
mode: single
alias: Scene Save TV Lampe description: "" trigger: - platform: state entity_id: - input_boolean.helfer_bewegungsmelder to: "on" condition: [] action: - service: scene.create data: scene_id: zustandtvbeleuchtung snapshot_entities: - light.tv_bloom_eg_links - light.tv_bloom_eg_rechts - service: light.turn_on target: entity_id: - light.tv_bloom_eg_links - light.tv_bloom_eg_rechts data: brightness_pct: 100 rgb_color: - 255 - 0 - 0 - delay: hours: 0 minutes: 0 seconds: 15 milliseconds: 0 - service: scene.turn_on target: entity_id: scene.zustandtvbeleuchtung metadata: {} - service: scene.delete data: {} target: entity_id: scene.zustandtvbeleuchtung mode: single
alias: Scene Save TV Lampe
description: ""
trigger:
  - platform: state
    entity_id:
      - input_boolean.helfer_bewegungsmelder
    to: "on"
condition: []
action:
  - service: scene.create
    data:
      scene_id: zustandtvbeleuchtung
      snapshot_entities:
        - light.tv_bloom_eg_links
        - light.tv_bloom_eg_rechts
  - service: light.turn_on
    target:
      entity_id:
        - light.tv_bloom_eg_links
        - light.tv_bloom_eg_rechts
    data:
      brightness_pct: 100
      rgb_color:
        - 255
        - 0
        - 0
  - delay:
      hours: 0
      minutes: 0
      seconds: 15
      milliseconds: 0
  - service: scene.turn_on
    target:
      entity_id: scene.zustandtvbeleuchtung
    metadata: {}
  - service: scene.delete
    data: {}
    target:
      entity_id: scene.zustandtvbeleuchtung
mode: single

Mit Home Assistant jede alte Türklinkel smart machen

Mit Home Assistant und einem Sensor der Firma Aqara kann man fast jede ältere Türklingel smart machen. Dafür sind keine großen Umbaumaßnahmen erforderlich. Und es ist zudem noch sehr günstig.

Diese ZigBee Produkte verwende ich * :

Diesen Vibrationssensor habe ich verwendet * :

Aqara Vibrationssensor, Erfordert Aqara Hub, Zigbee-Verbindung, Drahtloser Mini-Glasbruchmelder für Alarmanlage und Smart Home, Kompatibel mit Apple HomeKit, IFTTT, DJT11LM
  • Hinweise: Dieses Gerät benötigt Aqara Hub für den Betrieb. Erfordert eine sichere 2,4-GHz-WLAN-Netzwerkverbindung. Ein Aqara Hub kann bis zu 32 Aqara Geräte verbinden.Bitte beachten Sie, dass Sie das 5G-WLAN vor der Verwendung ausschalten müssen, wenn gleichzeitig 5-GHz-WLAN verfügbar ist.
  • Vibrationserkennung: Immer, wenn der Aqara Vibrationssensor eine unerwartete Vibration erkennt, sendet er Warnungen an Ihr Telefon oder aktiviert den lokalen Alarm am Aqara Hub. Bitte stellen Sie sicher, dass sich das Gerät in einem Umkreis von 7–10 Metern um den Hub und fern von Metall befindet, um eine Unterbrechung der Verbindung zu vermeiden.
  • Vielseitiger Bewegungssensor: Der Aqara Vibrationssensor kann auch Neigungs- und Fallbewegungen erkennen, wenn er an einem Objekt befestigt wird. Daher können Sie den Sensor an Ihren Wertsachen oder Schubladen anbringen und benachrichtigt werden, wenn Bewegungen vom Gerät erkannt werden
  • Smart Home: Der Aqara Vibrationssensor kann entwickelt werden, um andere an Aqara angeschlossene Geräte zu steuern und auszulösen, wenn Vibrationen und/oder Bewegungen erkannt werden
  • Einfache Installation: Keine Verkabelung oder Schrauben erforderlich

Türklingel Automatisierung

Plain text
Copy to clipboard
Open code in new window
EnlighterJS 3 Syntax Highlighter
alias: Tuerklingel hat ausgelöst
description: ""
trigger:
- platform: state
entity_id:
- binary_sensor.tuerklingel_vibration
to: "on"
condition: []
action:
- service: notify.notify
data:
message: Es klingelt an der Tür!
title: Information
- service: notify.alexa_media_keller
data:
message: Es klingelt an der Tür!
title: Information
- service: camera.snapshot
target:
entity_id: camera.carport
data:
filename: /config/www/snapshot.jpg
mode: single
alias: Tuerklingel hat ausgelöst description: "" trigger: - platform: state entity_id: - binary_sensor.tuerklingel_vibration to: "on" condition: [] action: - service: notify.notify data: message: Es klingelt an der Tür! title: Information - service: notify.alexa_media_keller data: message: Es klingelt an der Tür! title: Information - service: camera.snapshot target: entity_id: camera.carport data: filename: /config/www/snapshot.jpg mode: single
alias: Tuerklingel hat ausgelöst
description: ""
trigger:
  - platform: state
    entity_id:
      - binary_sensor.tuerklingel_vibration
    to: "on"
condition: []
action:
  - service: notify.notify
    data:
      message: Es klingelt an der Tür!
      title: Information
  - service: notify.alexa_media_keller
    data:
      message: Es klingelt an der Tür!
      title: Information
  - service: camera.snapshot
    target:
      entity_id: camera.carport
    data:
      filename: /config/www/snapshot.jpg
mode: single

Configuration.yaml

Plain text
Copy to clipboard
Open code in new window
EnlighterJS 3 Syntax Highlighter
camera:
- platform: local_file
name: camera_snapshot_haustuer
file_path: /config/www/snapshot.jpg
camera: - platform: local_file name: camera_snapshot_haustuer file_path: /config/www/snapshot.jpg
camera:
  - platform: local_file
    name: camera_snapshot_haustuer
    file_path: /config/www/snapshot.jpg